Dana Vrajitoru
I310 Multimedia Arts and Technology
I310 Lab 10
Date: Tuesday, November 8, 2016. Due date: Tuesday,
November 15, 2016.
Ex. 1. In this exercise we will create a key-frame animation
where the shape of objects is interpolated.
Open Flash CS6 and create a new ActionScript 3.0 project (first option
at the top). Save it as bird.fla.
Bird
Change the workspace type to Animator (top right corner of the
window, like for Illustrator).
The Stage is the area where your movie is going
to be drawn, shown as a big white rectangle in the middle of the
window.
Click on the Stage and in the properties panel (top
right) you'll see a property marked with a white rectangle with the
label Stage. Click on it to change the background color for
the stage to light blue.
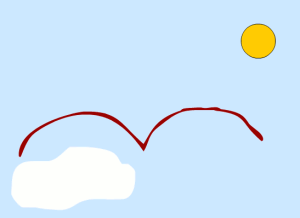
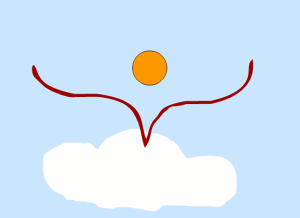
Here is a snapshot of what we'll try to achieve in the
first frame:

Insert a new layer: from the Timeline are, below the
list of layers, there is a button to create a new layer.
We will use this layer to create a reference that we can
use to draw the bird.
Using the Brush tool in the drawing toolbar above the
stage, mark a point somewhere in the center with a little smudge. Then
using the Line tool, draw two vertical lines on the two sides
of the center mark, approximately equally distanced and close to the
border of the image.
The center point will be the center of the bird, and the
two vertical lines will mark the end of the wings. This way, the wings
movement will follow the vertical lines.
Assuming that the new layer is called Layer 2, go back
to Layer 1. Switch to the Brush tool. Draw the
outline of a flying bird with the wings pointing down using - like two
parenthesis upside-down (see image above). Use the marks in Layer
2 to start the center of the bird in the center you marked and to
make the wings span left and right towards the two vertical lines that
you've drawn.
We have the first key-frame. Let's create the second
one.
Go to frame 30 in the timeline, right-click under it on the first
layer, and do Insert Blank Keyframe. Draw a bird
approximately of the same size but with the wings now pointing up -
like a rotated '}'.
Use the reference layer to start the wings approximately
at the same point in the center and the wings span towards the same
vertical lines. If you cannot see it, right-click on it in the first
frame, do Copy Frames, then right-click in the place in Frame
30, and do Paste Frames
Here is an example of what this frame might look like
when we're done:

Right-click on frame 1 in Layer 1 and do Copy
Frames. Then click on 60 , right-click on Layer 1, and
paste the frame. Once you are done with the 3 key frames, delete the
reference layer (Layer 2).
We have the key-frames for the bird, let's create the
intermediate ones.
Right-click in the timeline somewhere in between the first frame
and the 30th one and do Create Shape Tween. Repeat the
operation for the frames 30 to 60. Click on the Play button
below the Timeline to test the movie.
Sun
Add a new layer to the stage.
For this, you can use the New Layer button
under the list of layers to the left of the timeline. Using
the Oval tool (option for the Rectangle), create a
sun either on the right hand side or on the left. Change the color of
the sun to a shade of yellow. Select the whole sun object and copy
it.
We're going to create two more frames containing the sun
in a different position and color.
Go to frame number 30 and right-click in this new layer. Insert a
blank keyframe, then paste the sun object into it. Move it somewhere
toward the center of the scene, slightly below its original vertical
position. Then change its color to a shade of orange.
You can also copy the frame to position 30 and then move
the sun object.
Repeat the operation to create another copy of the sun object in
the last frame, place it on the opposite side of the window from where
it started, even further down vertically, and change its color to a
shade of red.
The change in color of the sun is because we're creating
a sunset.
Right-click in between the frame in the second layer and create a
shape tween for each segment. Test
the movie to see the effect.
Alternatively, simply creating the frame 60 and
interpolating in between would also have had the same effect.
If the sun appears to be on top of the bird, grab the layer
containing the sun (2 or 3) in the list of layers and move it
down.
Cloud
Add a new layer and click on it to make it active. Move it
between the first two layers if it's not there already.
The sun layer should be at the bottom, the cloud on top
of it, and the bird at the top. This decides order in which the
objects are drawn to the screen.
Switch to the Brush tool and change the stroke and fill
colors to white. Using the Brush tool, create an vague white
fluffy shape.
It doesn't matter much what it looks like as long as
it's a closed shape.
Switch to the Paint Bucket tool in the drawing toolbar
and click inside the cloud to fill it with the same color
uniformly. Move the cloud to the bottom of the window and on the opposite
side of the sun.
You can use the Eraser to smooth out any
outstanding bits.
Insert a blank keyframe at the point 30 in the timeline. Repeat
the operation to create a cloud of a slightly different shape in the
middle of the stage, still in the lower half (see image linked
above). Then repeat it again to create another cloud in the frame 60
on the other side of the stage from where you started.
You must finish any edits to the cloud shapes before
creating the animation.
Right-click in the timeline on the third layer to create the shape
tweens for the two sets of frames. Test the movie to see the
effect. Here is an example of the final result form this
lab:
bird.swf.
We are not simply copying the cloud so that its shape
itself can change during the animation.
Save your file and test it.
Flash saves the project with the extension .fla
and creates movie files that can be played in a browser or in a
stand-alone Flash Player with the extension .swf. Normally as
soon as you test a project, this file is created. You will need to
upload the two files for the homework: the .fla and the .swf.
Ex. 2 In this exercise we will create another key-frame
animation.
Create a new project of the same type and save it under the name
cube.fla.
We will try to create a 3D-like animation of a
cube. Here is an example of the result.
Set the stage color to whatever you want. Set the color of the
Stroke to something contrasting with it. Set the color of the Fill to
None (a small white square with a red stroke over it). Using the
Rectangle tool, create a square in the middle of the
stage.
Holding the Shift while you create the rectangle should
create a perfect square.
Using the selection tool, select the entire rectangle, then from
the Modify menu, choose Convert to Symbol. You can
give it a class name such as SquareFace.
Certain types of animations work better with objects
converted to symbols.
Add a new layer (Layer 2). In this layer add 3 lines to
create the top face of the cube as we look at it in perspective. For
this, start the first line from the top left corner of the square
going up and to the right at some angle. Then with the selection tool,
select the line, copy it, and paste it, then move the pasted line to
start from the top right corner of the square. Then add a horizontal
line to complete the face.
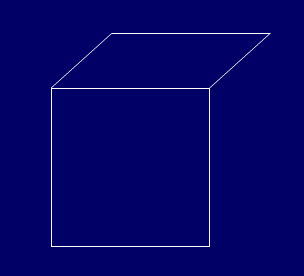
Flash has a snap to grid or to existing points feature
that should help creating a perfect cube. Here is an example of the
result:

Switch back to Layer 1 (important), then select the
square object and copy it with Ctrl-c. Go to frame 30 and
insert a new blank keyframe. Paste the square into it, then align it
so that the top edge matches the top line in Layer 2 (the top
face).
If you can't see the top face of the cube, copy the
frame from Layer 2, frame 1, into frame 30.
Then right-click between these frames in Layer 1 and do
Create Classic Tweening. Play the clip now. The square should
be moving smoothly between its first position and the second one,
while the lines in Layer 2 should not be moving.
The Classic Tween animation requires the object
to be converted to a symbol first.
If you haven't done this, right-click on the first frame in Layer
2 and choose Copy Frames. Then right-click on frame 29 in Layer 2 (to
the left of 30) and choose Paste Frames.
This should create a key frame from the one you have
copied. You should see the top line of the top face just a little
above the top edge of the square in this one.
Change the zoom to 400 or 800. From the toolbar click on the Free
Transformation tool. Move the bottom points of the two parallel lines
in Layer 2 over the corresponding top corners of the cube, so that the
whole thing looks like a solid surface. Then you can move the zoom
back to 100. Right-click on the timeline between the frames 1 and 29
in Layer 2 and create a shape tween. Play the movie now.
It should look like the top face is disappearing
smoothly.
Create a third layer. Using a similar technique, create a face of
the cube on the right and also make it disappear through
tweening.
When applying the Free Transformation Tool, make sure
that only one line at a time is selected.
If you have time in class, or on your own at home if not, create
bottom and left faces that appear instead of disappearing. You will
need 3 more layers for these 3 animations.
Alternatively, you can create a hexagon for the outer
border of the whole object that is fixed through the entire animation,
and only animate the two diagonal lines that change during the
animation.
Upload to Canvas: The two files in .fla format and the two
files in .swf format and 2 more files for the homework (6 total).
