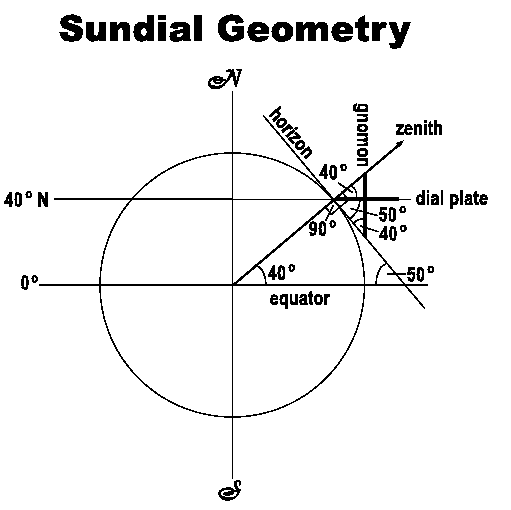
We will try to recreate the following image, taken from here (www.wsanford.com):

In this lab we will create two vector drawing images reproducing the illustrations right below and further down in Exercise 2. We will use Adobe Illustrator for this. If you don't have it at home, you can use the free program Inkscape (https://inkscape.org/en/) instead. All the tools you need will be there, but you'd have to find them out.
Ex. 1 Technical drawing
We will try to recreate the following image, taken from
here (www.wsanford.com):

Open Adobe Illustrator from CS6, then create a new document. The default width and height should be sufficient (at least 600x600). Make sure that the file orientation is landscape. Save it as lab3a.ai.
In the top right corner, switch from an Essentials workspace to a Painting one.
Let's start by creating a circle. In the toolbar on the left side you will see a rectangle tool. If you click on it and hold the mouse button down, a little menu should appear where you can choose other shapes to use. Select the ellipse from here. Then click and drag on the page to create a fairly large circle. To make sure that you are drawing a perfect circle, hold the shift while creating the circle. Once it is drawn, click on the Selection tool (in the top left corner, it looks like a mouse pointer) and move the circle towards the middle of the page. You can also resize the circle if it's not big enough.
Above the document area, there should be a toolbar labeled Path. With the circle still selected, change the Stroke to 2pt. To the left of the Color area on the right, there is a small vertical toolbar. Click on the Appearance button, and the on Fill to open it. Select a pale blue color for the fill, and then set the Opacity for Fill only (not for the entire object) to 50%. The border of the object should look solid black.
Let's add the two axes next. Above the Ellipse/Rectangle tool there should be a Line segment one. Click on it. Draw two lines by clicking on the first point, moving the mouse to the second location while holding the shift to make the line horizontal or vertical, and then clicking on the end point. It is not important for the axes to cross precisely in the circle's center for now. Make sure that the axes are long enough to cross the circle on both sides.
Let's align these axes now. Go back to the Select tool (top left corner). Click on the circle to select it, then on the vertical axis while holding the shift. Then in the Path toolbar, find the tool that does Horizontal Align Center. Click outside the objects to deselect them. Then click on the circle again and shift-click on the horizontal axis. Align them vertically centered.
Next we'll create a little arrow to put at the end of the horizontal line. With the line tool, draw a small horizontal line (of the length of the arrow) someplace else in the page. Set the stroke width for it to 10pt. Then in the Drop-down menu next to Stroke that currently says Uniform, choose the triangular shape for it. Then using the Selection tool, move it to the end of the horizontal axis. The guide in green that lights up when you get close to the line should let you align them properly, but you can also use the alignment tools afterwards to align them better.
Let's make a copy of this arrow and rotate it to make it vertical. With the selection tool, select the arrow, then copy and paste it. Select the new arrow and then from the Object menu, choose Transform and then rotate. In the dialog that opens, enter 90 for the angle. Then place the new arrow at the top of the vertical axis. Save the document.
Now we would like for the two axes with their respective arrows to act as single objects. For this, select the horizontal axis and its arrow, and then from the Object menu choose Group. Repeat the procedure for the second axis.
Let's add the radial line that goes at 40 degrees from the center. With the line selection tool, click on the center of the circle for the starting point (the green guide should say Intersect). A dialog should open instead of waiting for you to click for the second point. Here you should be able to enter an angle of 40 degrees. Set the length to about 50 points. If the line is not long enough, you can use the selection tool to drag the top corner while holding the shift down to maintain the angle. Make it long enough and then re-center it (the guide should help you). By doing another paste right now, another copy of the arrow should be created. Apply a rotation of exactly 40 degrees to the arrow, then move it to the top of the radial line.
Add 3 horizontal lines that intersect the circle in the same point as the radial line. We need 3 of them because they have different width. Set their width as 1 for the thinnest one, 2 for the medium one on the left, and 3 for the smallest one on the right. Note that you can start drawing the first one from the intersection point itself, and hold the shift for all 3 of them to make them horizontal. Don't forget to save it again from time to time.
Add a line that is tangent to the circle in the intersection point (like the one marked "horizon" in the image). Click on the intersection point (the guide should say Anchor) and release the mouse to bring up the dialog. Here enter an angle of 130 degrees to make it perpendicular to the radial line. Enter a length of about 50 points. You will probably have to resize it and reposition it with the selection tool afterwards. Set the width of this line to 1pt.
Add a vertical line for the one called gnomon in the image. The start and end points should snap to the lines that they cross. Change the width of this line to 3. At this point it's a good idea to zoom in on the relevant part of the image (the Zoom tool is at the bottom of the left-side toolbar).
Next we'll create an arc marking the angle at the center of the circle. If you click on the line tool and hold, a little menu should appear with other options. Choose the Arc tool. Then click on the starting point on the horizontal axis and drag towards the ending point on the radial one. The guide should help you snap to the axes so that your arc fits nicely in place. Make the stroke width of this arc 2pt. You can make a copy of this arc at the intersection of the radial (zenith) line and the one marked dial plate, or draw a new one. Make a copy of the first arc, then from the Object menu choose Transform, then Reflect. In the dialog that open choose Vertically. Move this new arc to the intersection between the tangent line and the horizontal axis (marked with 50 degrees in the image).
Let's add some text to this figure. You can zoom out for this purpose. Click on the T tool in the toolbar on the left side of the window. Click above the vertical axis and type N. Select this text with the selection tool, then in the top toolbar change its font and size the way you want. Make the font larger, maybe 18, and bold, then click Apply. Using the selection pointer, make a copy of this object at the bottom of the vertical axis, then switch back to the text tool (A) and change the text to S. Unselect it. Select the vertical axis first, then the two text objects holding the shift down. Align these objects horizontally in the center. This should leave the axis in place and move the text objects to be centered on it.
Add another text box next to the tangent line and type horizon. Change the font for this one to about 14 and regular instead of bold. Then go back to the selection pointer. Select this object and apply a rotation of -50 degrees to get the orientation right (it's the opposite of 130). Move the text over the tangent line as shown in the image.
Click and hold on the T tool. In the menu that appears, choose Vertical Type Tool. Type the word gnomon somewhere above the vertical line where it can be seen in the image (you can reposition it later).
Switching back to the normal text tool, add the text 40 next to the arc at the center of the rectangle. Without switching tools, from the Type menu choose Glyphs. Looking around in the available characters, you should find one that stands for degrees. Click on it to add it.
At this point zoom out to be able to see everything properly. Click and hold on the rectangle tool to switch back to a rectangle. Add one big rectangle to the image covering all the objects. Edit the fill of this rectangle using a radial gradient with some light transparent colors. Then with this rectangle still selected, go to the Object menu and click on Arrange, then Send to Back. Everything else should appear on top of it now.
Save this file, then save it again in svg format (for the curious, you can click on a button SVG code at the bottom of the Save As dialog to see what it looks like). Then from the File menu choose Export and then save it as a png file too. Open the svg file with a browser and the png file in the preview to double-check the result.
Ex. 2. Vector-style art
We will try to reproduce the following image, taken from
here:

This will be detailed in the homework.