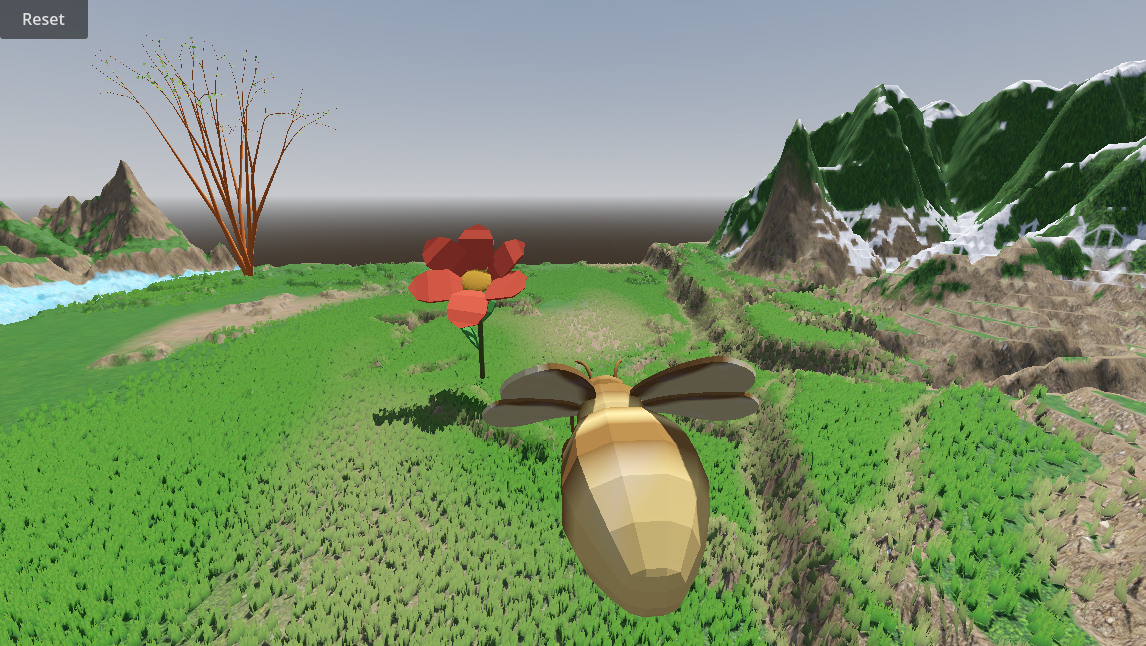

In this lab, we will continue the project from the last week and add vegetation to the map, as well as the bee object.
Ex. 1. In this lab, we'll add first some trees to the map and then the bee object.
a. Vegetation Painting
Download the following file:
Extract the files from it. In the project, create a new folder called trees and drag and drop both the .obj and .mtl versions for the birch and the small pine files to the trees folder.
Grass
Drag the file grass.png into the textures folder in your project. Then select the World object (the terrain) and click on the Paint Details button (4th from the left) in the inspector. Under Paint Details Control, click the + button to add another detail layer (or the button Edit Details if you see it). From the options, select Grass Texture. In the Add Grass Texture dialog, drag the file grass.png from the assets and drop it over the first box labeled Detail Texture. Increase the alignment to the ground around 20%, and the position jitter to about 15%. Change the minimal height to 2, then click Add at the bottom to create the texture. You will see it appear under Details.
Now select a fuzzy brush with a large size and a medium opacity. Go over the grassy parts lightly and spread this detail over the terrain. Check the camera's position and make sure to add some around that area. Note that the grass may not show on the terrain unless you get really close to the surface. Play the game and come close to the surface to see the result. You can click on the Terrain Settings button and scroll down to Tree and Details Objects, and increase the Detail Distance to see them better. You can experiment with the other settings here as well, suc as the wind parameters.
Trees
Create a folder under Assets called Prefab.
Drag the object birch that has a little arrow on it to the scene to a place where you can see it. Set its scale to 3 x 3 x 3 or something else that fits your terrain. Then set its coordinates in the transform to 0 x 0 x 0, and drag it from the hierarchy into the Prefab folder. Now we have a prefab for this object. You can delete it from the hierarchy.
Select the World terrain again. Click on the Tree Paint button and click Edit Trees, then Add Tree. Drag the birch object from the Prefab folder and drop it over the Tree Prefab box. If this works for you, paint with the tree in the scene however you like. If not, we will add some from the code anyway.
b. Bee Object
If you are happy with the result you got from lab4, open your file bee.blend in Blender. Delete the camera and the light, and then export it as an FBX (.fbx) object. This should create the file bee.fbx.
If not, you can also use my solution to that lab that is included in the zip file.
Drag the file bee.fbx into the Art section of the assets. Double-click on the camera object in the hierarchy to select it and focus on it. Drag the bee object with an arrow on it to the scene around the camera and position it so that we can see it. Place the camera and bee at a comfortable distance and position from each other from the point of view of the player. Rename the object Player and assign it the tag "Player".
Add a Rigidbody to the bee and in its properties, un-check the box "Use Gravity" and set the mass to 0.1. Then add a capsule collider to it. Turn the view to see the bee's longer side and choose the Direction of the collider so that the longer side of the capsule is aligned with the bee's. At this point, click the button next to Edit Collider and pull the small dots to align the collider with the bee's body as best you can. It's ok if the legs and wings are not contained inside.
This object does not show the colors we've assigned to the vertices yet. Drag the file VertexColorShader.shader from the zip file into the folder Scripts of the project. This should import it.
Create a new material and call it vertexShader. In the inspector at the top, in the menu next to Shader, select Custom - VertexColorsStandard. Then select the body of the bee and in the Mesh Renderer, change the Element 0 in the Materials from the material shown now to vertexColor. You will also have to do this for all the other components. However, you can select all of them together from the Hierarchy and apply this change just once. After this, you should see the same colors that you had in Blender.
Add a new script to this object and call it PlayerControl. Open it in the editor (Visual Studio or whatever you use). Copy the code from the CameraMovement script into the PlayerControl script. Then remove the script component from the camera, remove the Rigidbody component from the camera, and make the camera a child of the Player object.
In the script property of the player in the inspector, set the Speed to 20 and the mouse sensitivity to 0.2.
d. Flower Object
Drag the files flower.obj and flower.mtl from the zip file into the Art folder of your project, then drag the object to the scene. Place it close to the bee so that you can compare them for size. I recommend using an isometric view to work on this part. For example, for the bee provided in the zip file, the flower should be scaled at least at 7 x 7 x 7.
The color for this object has been set at the level of the object and not of the vertices. It should show on the object as you add it to the scene. If not, you can create the materials in Unity and apply them to the different parts of the object.
Add a sphere collider to the flower and use the edit points to center it on the yellow center (the pistil). Check the box Is Trigger for the collider. Set the coordinates of the whole object to 0 x 0 x 0. Refocus the view on the flower object by double-clicking on it in the hierarchy.
Add a new script to the flower area called FlowerControl and open it. Declare a boolean class variable called hasPollen and initialize it as true in the function Start. Also add the following class variables:
public Material petalMat;
public MeshRenderer pistil;
Then going to Unity, choose for the first variable the red material of the petals and for the second one, the Pistil_Material.002 child of the flower.
Now for the collision, add the following function that will be called when there's a collision, presumably with the bee. What we want to do is change the material assigned to the center of the flower so that the flower is marked as depleted of pollen.
void OnTriggerEnter(Collider other)
{
    if (other.tag == "Player" && hasPollen)
    {
        hasPollen = false;
        pistil.material = petalMat;
    }
}
At this point, drag the flower object from the hierarchy into the Prefab folder to turn it into a prefab.
e. Code Instancing
Create an empty object to the scene called GM (for game master). This object will be in charge of objects generated in the code. Set its coordinates to 0 x 0 x 0 and add a new script to it called GameMaster.
Let's create a few instances of flowers in the function Start and place them randomly on the map.
At the top of the class, define the following variables:
public Terrain worldRef;
public GameObject flowerRef;
public int flowerNr;
float worldWidth, worldDepth;
GameObject[] flowers;
Back in Unity, choose the World object for the World Ref property. Then drag and drop the prefab of the flower over the Flower Ref property. Then set the Flower Nr property as 10.
Then add the following code to the function Start:
float fx, fz;
worldWidth = worldRef.terrainData.size.x;
worldDepth = worldRef.terrainData.size.z;
flowers = new GameObject[flowerNr];
for (int i = 0; i < flowerNr; i++)
{
     flowers[i] = Instantiate(flowerRef) as GameObject;
     fx = Random.Range(0, worldWidth);
     fz = Random.Range(0, worldDepth);
     Vector3 pos = new Vector3(fx, 0f, fz);
     pos.y = worldRef.SampleHeight(pos);
     flowers[i].transform.position = pos;
}
After this, when you run the program, 10 flowers should appear on the map and be spread around randomly.
Reset Button
The functionality of the Reset button needs to change a little because it is now attached to the bee instead of the camera. First, in Unity, change the button's On Click() action and connect it to the class Player and the function Reset(). Then in case the bee ran into something and started spinning, set the rbody.velocity and rbody.angularVelocity both as a new Vector3(0, 0, 0).
Ex. 1. Flowers
a. Sound and Score
Add a sound to be played when the bee collides with a flower that still has pollen. Also add a score and increment it every time that happens. Add a text mesh to the screen to display the score, and update it when the score changes. Hint: you can add a public reference to the player object to the FlowerControl script to be able to increment the score on collision, and connect it to the player object in Unity. You'll need to use GetComponent<PlayerControl>().score from the player reference to access an attribute by that name defined in the PlayerControl script. You can also use the other parameter as the player object instead of a reference in the class.
b. Random Rotation
When the flower objects are instantiated in the code, apply a random rotation to them between 0 and 360 degrees around Y.
Ex. 2. Random Trees.
Use either one of the provided tree objects, or one of your own, to create a tree prefab scaled with the bees and flowers in mind, and use it in the code in GameMaster to generate a few random trees around the map. Make sure to place them at the appropriate height.
Ex. 3. Floating Bee
Declare a public variable in the class PlayerControl called hoverHeight and set its value to something like 4 in Unity. Then in the function Update, after moving and rotating the bee with keys and mouse, check the height of the bee is lower than the height of the terrain in that point plus the hoverHeight, and if it is, then adjust the y coordinate of the bee to the value of the sum. That way, if the bee gets too close to the ground, it will be pushed back up. This includes when we lower it with PageDown.
Create a zip file containing a Windows executable and the script files. Also take a screen shot of the running application and save it as a png or jpg. Make sure that the zip file includes the following:
Submit the zip file containing the Windows executable and the script files to Canvas, Assignments - Homework 6.