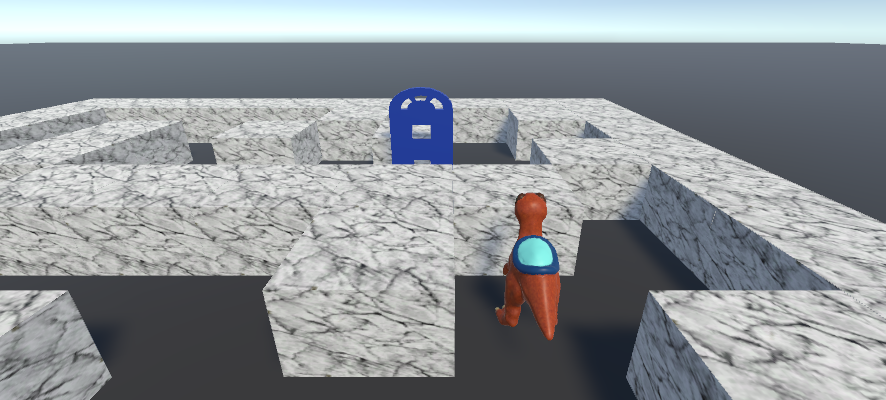

In this lab, we will integrate the animated raptor created in Blender the last week in a program. We will also create a maze for this program procedurally.
If you are happy with your result for Homework 7, please use it. If not, you can use my version instead (download all the files):
raptor_walk.blend
raptor_texture.png
raptor_walk.glb
In this lab, we'll create a 3D scene and add the raptor object to it, then create a maze procedurally.
a. Setup
Create a new Godot project called Key Master. In the res:// folder, create a folders called Materials, Scenes, Scripts, and Models.
Add a 3D Scene node called Root. Add the sun and the environment to the scene like before, as well as a Camera 3D object.
Add a StaticBody3D object called Ground. Add a child of it of type MeshInstance3D. Set its Mesh as a New PlaneMesh, then click on the plane in the inspector and set its dimensions as 10 x 10. Set its Material as a new StandardMaterial3D and set the Albedo property of this material in a color you want.
Move the camera object up a bit and in the opposite direction of the one it's looking at on Z, and then rotate it around X toward the ground a little bit. You should be able to see a good part of the plane in the preview.
Add another child of the Ground object of type CollisionShape3D and sets is Shape as a box. Adjust the red dots on the collider to fit the ground.
Save the scene as key_master.tscn and move it into the Scenes folder. Run the program and set this scene as the main scene.
b. Adding the Raptor
If you are using your own model, open it in Blender and export it as a glTF 2.0 file. In the folder, you should see a file called raptor_walk.glb (or whatever name you gave it).
If you want to add another animation cycle to the raptor, such as Idle, in Blender, with Action Editor selected in the dope sheet, click PushDown to stash the walking cycle away for later use. Move the cursor to frame 1, select all the bones and apply Pose - Clear Transformations - All, then insert the key frame with I. Go to frame 10 and create a pose you think as appropriate, like pulling the body bone up, then insert the key frame. Copy the first frame to position 20, then set the End marker of the animation to 19. With Action Editor still selected, check the Manual Frame Range on the right and set the end of the cycle to 19. Check the Cyclic Animation button.Then change the name of the action to Idle. Save the file and export it as glTF again.
Drag the glb raptor file together with the texture file to the res:// folder inside the Models folder. It may take a little while to import it. Once it's there, drag the glb file to the scene.
You should see it with the texture already there. Since it's a lot bigger than the plane, set its scale in the transformation to 0.01 x 0.01 x 0.01. We'll adjust it later as needed. In the hierarchy, it will show with a movie icon on it (a scene marker). Right-click on it in the hierarchy and select Make Local. This will show the components of the raptor like the armature, skeleton, and mesh (Yoshi), as well as an AnimationPlayer object.
Click on the AnimationPlayer object. A timeline will appear below the scene and you should see WalkCycle next to Animation above it. You can click play to test the walking cycle. If you used my model, you should be able to choose between two animations: Idle and WalkCycle.
If one of your animations is not playing in a cycle, with the AnimationPlayer object selected, click on Animation below the scene editor, then select Manage Animations. In the dialog that opens, right-click on Global and select Make Unique, then click on the save button on the Global. This should enable you to make changes to the animations you imported. Click ok and switch to the Idle animation. Now you should be able to click the cycling button on the right-hand side of the timeline (it looks like two circling arrows).
You can switch between the two animations and play them to test them out. We'd still like to adjust their speed.
With the AnimationPlayer still selected, in the inspector, notice the Speed Scale close to the top. From the arrow next to Current Animation, select the Idle animation. Adjust the speed as you want. I found that 0.5 works fine for it. Then switch to the WalkCycle animation and adjust the speed again. This one seems to work better at 1.3.
c. Choosing the Animation
Move the raptor to position 0 x 0 x 0. Add a node of type CharacterBody3D to the scene and call it Player. Drag the raptor_walk object (the root of the subtree) and make it a child of this node. Then add another child of the player of type CollisionShape3D. Set the Shape as a box, then adjust the red dots to fit the raptor tight. You can let the tail and the nose stick out of the box a little.
Select the Player object, and in the Inspector, expand PhysicsBody3D and lock the rotation over X and Z.
Then add a script to the Player object, the default name is fine. In the script, set the speed to 2 and the jump speed to 3.
Add a reference to the AnimationPlayer child of the raptor at the top:
@onready var animation_player: AnimationPlayer = $raptor_walk/AnimationPlayer
Now in the function _physics_process, add the following code before the call to move_and_slide:
if velocity == Vector3(0, 0, 0):
    animation_player.play("Idle", -1, 0.5)
elif velocity.y == 0:
    animation_player.play("WalkCycle", -1, 3.0)
d. More Objects
Download the following resources and drag them to Unity
into the res:// folder in the appropriate sub-folders:
wbrick.png
door.obj
key.obj
keySplash.png
keyWon.png
gm.gd
Add a new node of type StaticBody3D and rename it brick. Add a child of it of type MeshInstance3D and set its mesh as a new box of dimensions 0.4 x 0.25 x 0.4. Set its position as 0 x 0.125 x 0.
With the box shape selected in the inspector, drag the file wbrick.png from the Materials folder under res:// and drop it over the box to apply it as material.
Add another child of the brick object of type CollisionShape3D. Set its shape as a new box and adjust the dimensions to fit the brick. Once this is done, right-click on the brick object in the hierarchy and select Save Branch as Scene.
Add the key and door objects to the scene and resize them to a size comparable to the brick. I used a scale of 0.2 x 0.2 x 0.2 for the key and of 0.15 x 0.12 x 0.15 for the door. Set their colors by assigning them a new standard material in Surface Material Override of the Mesh properties, then setting the Albedo property with the color you want.
You can delete the brick object from the hierarchy for now.
e. Camera
Adjust the camera so that you can see the raptor pretty well. Then add a script to it. Here, add a reference to the player object so that we can follow it around:
@onready var player: CharacterBody3D = $"../Player"
Declare the following class variables: offset, trackballOn, pitch_input = 0.0, and mouse_sensitivity = 0.001.
In the function _ready, set trackballOn to true and offset as position - player.position.
Then add the following to the function _process:
position = player.position + offset
Test this functionality now. The camera should be following the player as it moves around.
Add the following function to the class:
func _unhandled_input(event: InputEvent) -> void:
    if event is InputEventMouseMotion and Input.is_mouse_button_pressed(1) :
        pitch_input = -event.relative.y * mouse_sensitivity
    else:
        pitch_input = 0
    if event is InputEventMouseButton and event.button_index == MOUSE_BUTTON_WHEEL_UP:
        offset *= 0.9
    elif event is InputEventMouseButton and event.button_index == MOUSE_BUTTON_WHEEL_DOWN:
        offset *= 1.1
Then in the function _process, add the line
rotate_x(pitch_input)
Test the program now. It should tilt back and forth with the left click and drag, and should zoom in and out with the scroll button.
Create a simple Node3D object as child of the root and rename it GM for Game Manager. Add a script component to it, but instead of a new script, click Load of Quick Load and select the file gm.gd.
Check at the top of this script for the definition of the constant BRICK. If the scene brick.tscn is in a different folder, edit that line and write the correct path there.
If you run the program now, it should show a maze of 10 x 10 at the start.
Let's create an introduction or "splash" page for the game. You can use the provided image keySplash.png, or create your own, as long as it shows the game name and the raptor.
Let's add a global variable to the project to keep track of the level. From the Project menu, open Project Settings. Click on the Globals tab. Enter Global in the Name box and click Add. A panel opens where you don't need to change anything. This will create the script global.gd.
Open this script and add the line
var level = 1
Create a new scene and add a Node2D root node to it called Start. Save the scene. Set the size of the window in Project Settings to something like 1200 x 700 or something smaller if it doesn't fit your window. This way, you can set the objects to look good in the size you'll export the project with.
Drag the image keySplash.png to this scene. This will create a node of type Sprite with it. Resize it so that it covers the entire viewport (which is shown as thin blue lines in the scene editor)
Create a new node of type Button and call it PlayButton. Edit the text it shows to display "Play". Add a new script to it. Then click on the Node tab in the inspector and on the signal pressed. At the bottom of the inspector, click Connect. Select the script attached to the button and let it add a function for it. Then in this function, add the code:
Global.level = 1
get_tree().change_scene_to_file("res://Scenes/key_master.tscn")
Make sure that the name of your game scene and the path to it are correct, otherwise edit the string in parentheses.
Now we'd like to switch the starting scene to this one when we press play. In the Project Settings, and click on Run on the left. Click on the file icon next to the name of the Main scene and select the splash scene.
This lab will be continued in the homework.