You can continue with the object you created in Lab 7 B, or download the file raptor_bones.blend. You will also need the file raptor_texture.png in the same folder. Open it in Blender. In this third part, we will create a walk cycle for this creature, then import it in the game engine.
In the top toolbar, click on Animation. This should show a Dope Sheet at the bottom and two editing panels at the top, with and without the bones showing.
On the bottom left side of the screen, below the timeline, click on Keying. Then click on the pair of keys just below Active Keying Set. Choose Location and Rotation from the options. This means that the animation will use the objects' location and rotation.
First, let's save the current pose as the rest pose so that we can retrieve it later if needed. In the biggest editing window, switch to Object Mode. Click on the skeleton to select it. Switch to Pose Mode. Hit A to select all the bones. From the Pose menu in the top toolbar, select Apply and then Apply Pose as Rest Pose. Now you can click outside the object to deselect the bones.
Let's create some IK chains so that we can create poses more easily. Let's start with the tail. Switch to Edit Mode. Select the last tail bone and extrude it towards the back of the raptor. Rename the new bone IK_tail. With this new bone still selected, from the top toolbar (second row), click on Armature and select Parent - Clear Parent. Confirm Clear Parent in the dialog that appears.
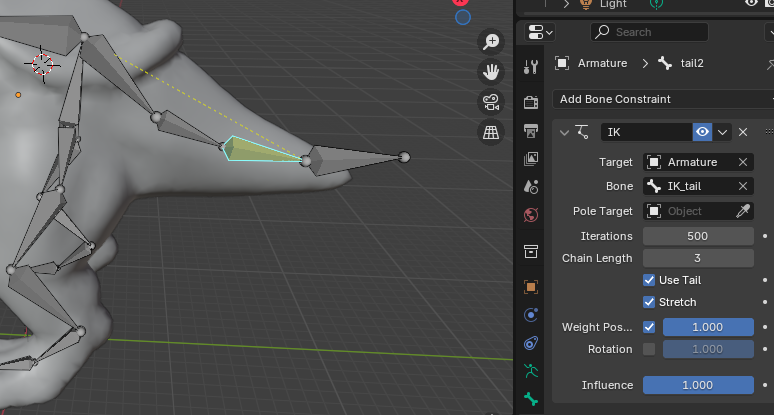
Select the previously last bone of the tail (tail2). Switch to Pose Mode. In the vertical toolbar on the right, click on the Bone Constraints button. Click Add Bone Constraint and select Inverse Kinematics. Set the Chain Length to 3. Set the Target as the Armature and the Bone as IK_tail. We don't have a Pole Target here:

To try out this chain, select the IK_tail bone and hit G to move it around. Notice how the rest of the tail bones and the mesh are moving with it. When you are done with the test, from the Armature menu select Clear Transform - All. This should reset the tail to its original position.
Let's create an IK chain for the legs. Switch to Edit Mode. Select the joint at the right ankle of the raptor. Extrude it towards the back of the leg horizontally. Rename it IK_leg_R. From the Armature menu, clear its parent.
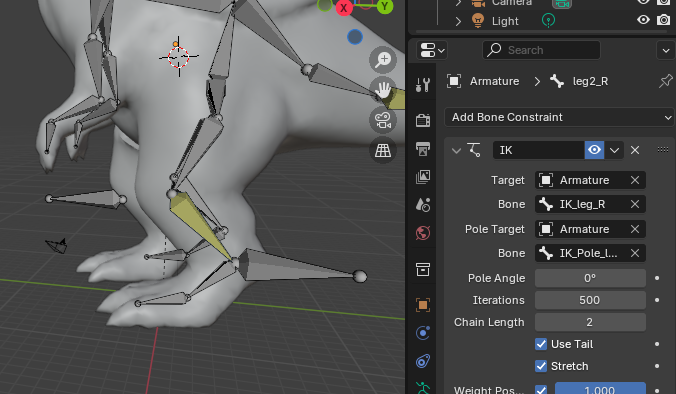
Switch to Pose Mode. Select the leg bone ending in the joint we extruded (leg2_R). Click on the Bone Constraints button on the right, then on Add Bone Constraint, Inverse Kinematics. Set the length of the chain as 2, then the target as the Armature, the bone as the IK_leg_R. Select the Pole Target as the Armature again and the Bone below as the IK_pole_leg_R. You can test the length of the chain of 2 and 3 to see which works better for you. Also, if you want to add a pole bone to the leg IK chains and you know what you're doing, go for it.

Redo the operation on the left side.
We build the motion by creating a number of key frames for it, and then letting the system interpolate all the intermediary positions.
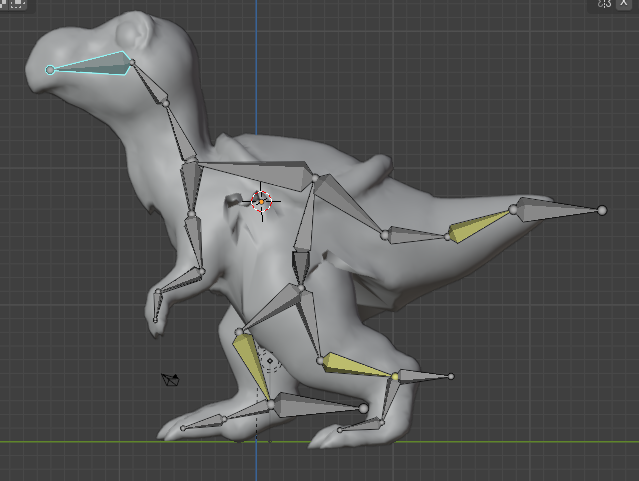
In Pose mode, switch to the Right Ortho view (X). Select the IK_leg_R bone and hit G to move it around. Move it up and a little towards the front. Then select the left one and move it back and up. Rotate the end bones in the foot up a little. Move the body bone down a little. Move the tail a little bit up and the same for the nose. Here is an example of the result:

From the top view, select the head bone. Rotate it towards the leg that is in the front. Rotate the arms up a little. Select everything by hitting A, then hit I to insert the key frame. In the Dope Sheet you will see an entry appearing for each of the bones.
In the Dope Sheet, zoom in a little (scroll), then click on frame 20. We'll insert a second key frame here. Reset the pose: from the Pose menu, select Clear Transformation, then All. Bring the foot that was in the back in the first pose up. Rotate the tip of the foot up as well. You can rotate the face bone down a little, move the tail down a little, the arms down, and the body bone a little up. Select everything, then insert another key frame with I.
You can now play the animation by clicking on play in the timeline, or just move the timeline cursor back and front to see the effect.
Create a pose symmetrical to the first one at position 40, and another one symmetrical to the second one at position 60.
Now move the cursor back to frame 1. Select all the bones with A, then from the Pose menu, select Copy Pose. Move to frame 80 and from the Pose menu, select Paste Pose, then I to insert a key frame. Our key frames are all done. Test the motion to make sure it looks good.
In the bar at the bottom of the dope sheet, set the End of the animation to 79 so that when it is run in a cycle, the first frame is not repeated. After that, if you play the animation, it will run in a cycle.
Let's save this walk cycle. Make sure that you're in Object Mode and that the Armature is selected. In the bar at the top of the Dope Sheet, there is a box with the text Dope Sheet. Click on it and switch to Action Editor. To the right of it there is another box saying ArmatureAction. Check the box saying Manual Frame Range and set the end as 79. Then check the box Cyclic Animation. Then in the dope sheet, under Summary on the left, double-click on the ArmatureAction name and rename it as WalkCycle. Save the file.
Turn in: the files raptor.blend integrating all 3 parts of the lab and raptor_texture.png or whatever the file name is for the texture.