
If you are happy with your result for Homework 7, please use it. If not, you can use my version instead:
raptor_walk.blend
raptor_texture.png
raptor_texture.fbx
a. Setup
Create a new Unity project called Key Master, of type 3D Core. In the Assets, create a folder called Models and another one called Materials. Rename the sample scene as KeyMaster.
Add a plane from 3D objects. Color it the way you want (use a material). Call it ground. Set its scale as 5 x 5 x 5.
b. Adding the Raptor
If you are using your own model, open it in Blender and export it as an FBX file. In the folder, you should see a file called raptor_walk.fbx (or whatever name you gave it).
If you want to add another animation cycle to the raptor, such as Idle, in Blender, with Action Editor selected in the dope sheet, click PushDown to stash the walking cycle away for later use. Move the cursor to frame 1, select all the bones and apply Pose - Clear Transformations - All, then insert the key frame with I. Go to frame 10 and create a pose you think as appropriate, like pulling the body bone up, then insert the key frame. Copy the first frame to position 20, then set the End marker of the animation to 19. With Action Editor still selected, check the Manual Frame Range on the right and set the end of the cycle to 19. Check the Cyclic Animation button.Then change the name of the action to Idle. Save the file and export it as an FBX file again.
Drag the files raptor_walk.fbx and raptor_texture.png at the same time into the folder Models. It should appear as a composite object containing inside the mesh, the armature, the materials, and the animations. Click on the raptor model and take a look at it in the Inspector. Click on the Animations tab. You should see the walk cycle we created, the idle cycle, as well as a default take. Check the Loop Time for both the walk cycle and for the idle cycle to allow them to be played in a loop, then click Apply.
c. Animation Controller
Right-click in the Models folder in the Assets (where raptor is) and create an Animator Controller. Name it raptorAnimator.
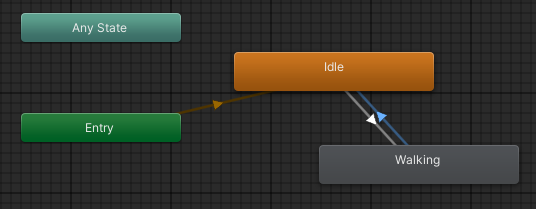
In the Inspector, click on Open in the animator's panel. It will open an animator window in the Scene area. Right-click in it and select Create State -> Empty. This will create a new node connected to the Entry. Rename this state Idle. Click on the selection circle next to Motion (it says None for now) and select the Idle motion. If you don't have one, leave it as None. If you use the provided Idle cycle, set the speed for it as 0.5.
Create a new empty state and rename it Walking. Select the walk cycle as its Motion. Set the speed of this motion to 3.
Right-click on the Idle state and select Make Transition. Drag the transition and drop it over the Walking state. Then click on the transition itself. Under Conditions, it will show an empty list.
We would like to add a condition on this transition. For that, first we need a parameter. To the left of the panel showing the states, you'll see a tab called Parameters. Click on it. Click the + to add a parameter, select the type Bool, and call it isWalking. Leave the box unchecked so that it is false when we start out.
Click on the transition from the Idle state to Walking. Under Conditions, click the + to add a condition. We want this to happen if the parameter isWalking is true. If that's the first option that is filled in, just leave it like this.
Create another transition from the Walking state to the Idle state. Add a condition to it, that the parameter isWalking is false. For now, we are done setting up this animation controller. See an example of the setup below.

Save the scene and click on the Scene tab to go back to scene editing.
d. Player Object
Drag the raptor model to the scene and place it on the plane. Disable its camera and light source. For that, expand it in the hierarchy and click on the eye next to the camera and light source to make them inactive. Or you can delete them. Rename the object Player. Set its scale to 0.1 x 0.1 x 0.1 and its position as 0 x 0 x 0. Adjust the camera position so that you can see it well.
In the Inspector, if the object doesn't have an Animator component,
add one from the Miscellaneous category. Then in the Animator
component, select the raptorAnimator as the Controller. Save your
scene. If you play it now, the raptor should be in the idle cycle when
the program starts.
Add a Box Collider and a Rigidbody to the raptor character with a
mass of 0.1. Un-check the box Use Gravity in the rigidbody and set the
Drag and Angular Drag to 0. Set the collision detection in the
rigidbody as Continuous. Then under Constraints, freeze the rotation
over X and Z. You will probably have to edit the collider to fit the
object better - it's ok if the nose and some of the tail stick out of
the box.
Add the following script to the project, then add it as a component
to the raptor character. Set the speed to 1.
If you run the program now, you will be able to move raptor around,
but the animation cycle will still be the idle.
e. Animation Transitions
Uncomment the commented line in the function Start
in PlayerController.
In the function Update add a condition where you check if
rbody.velocity.magnitude > 0, and if that's the case, then
set the isWalking bool to true and if not, to
false.
Now the walking animation should work only when the character is
moving. If the character starts rotating while it's moving, pull it
vertically off the ground by some small amount.
Finally, you can adjust the speed of the walking cycle in the
animator (click on the walking state after you open it) to match the
speed of the character.
Download the following resources and drag them to Unity
into the Assets in the appropriate folders: Wall object. Create a cube 3D object. Move it up so
that it sits on the plane (drag it on its vertical axis) and resize it
to be a little less taller than it is wide (I used about 0.4
scale for x and z and about 0.25
for y). Make sure the horizontal shape is still a square
(scale x and z together, or set them manually with
the same value afterwards). Verify that this object has a Box
Collider, and add one if it doesn't. Rename this
object brick.
Wall material. Create a new material (from the Assets menu)
in the Materials folder and call it wall. In Inspector, click
on the little circle to the right of the Albedo property and
select the wbrick image to apply to it. The sphere in the
bottom right corner should look like a white marble now. Drag the
material to the scene and drop it onto the cube object. Change the
color of the ground to dark gray or something that contrasts well with
the brick. Resize the raptor to 0.01 x 0.01 x 0.01 and adjust the
camera's position so that we can see it better.
Door object. Drag the door.obj object to the scene
to create an instance. Resize it so that it's no larger than the cube
horizontally. Apply a simple blue material to it (created the same way
as you created the plane material). Add a Box Collider to it
and resize it so that it covers the object snugly.
Key. Repeat the procedure with the key.obj
file. You can use the same material as for the door, or something
similar. Pull down all the objects to the level of the plane. Then
convert the brick, the door, and the key into prefabs. When (if) it
asks if you want to keep the original or create a variant of the
original, choose to create a variant.
Player. Set the tag of this object as Player. Set
the Drag to 0 in the rigidbody. Set the position of the
player in its transform as (0, 0, 0). Test the movement, and
if the raptor doesn't move, or if it rotates while moving, lift it up
from the plane by a small amount.
Camera. Move the camera so that it is a little behind and
above the player. Rotate it so that it looks at the player. Then add
the CameraControl script to the camera and connect the player
object with the player attribute of this component of the camera in
the inspector. For example, I have the camera at position (0.01,
0.508, -0.711) and with a rotation of (13.602, 0, 0). You can turn the
trackball on in the script component.
Now you can delete the brick object from the scene.
Game Master. Create an an empty object
called GM. Tag is as the GameController. Add the
script GameMaster as a component to it, then drag
the brick prefab onto its Brick Ref attribute. Set
the dimensions of the maze as 15 by 15.
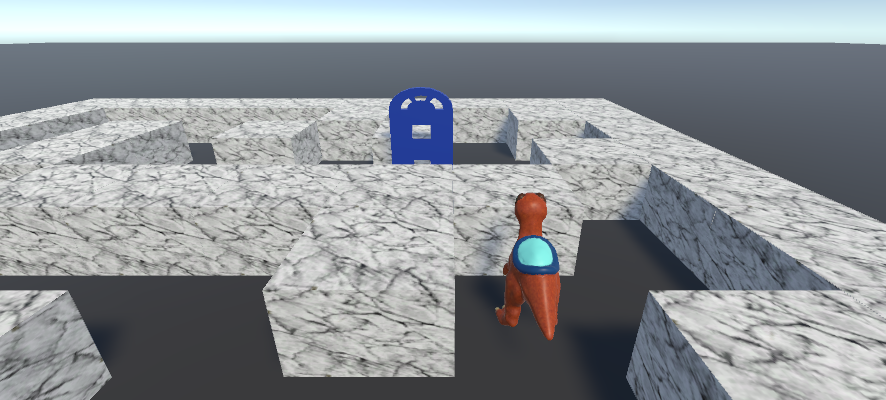
Compile the project and run it. You should have a maze and a
creature you control that can move through the maze. The camera should
follow the player around. If necessary, adjust the scaling of the
player so that it can move through the maze easily and adjust its
speed for comfortable play.
Let's create an introduction or "splash" page for the game. You can
use the provided image keySplash.png, or create your own, as long as
it shows the game name and the raptor.
Create a new scene and call it start. In this scene, switch the
camera first to Orthographic. Add a 3D Quad object and make
sure it faces the camera. It would be useful to constrain the game
layout to something specific, like 16:9, and to use the same setting
when you create the build. For that, you can click on Free
Aspect above the scene editor and choose a specific aspect. Then
in the build settings, you can set the size of the window to have the
same ratio as the aspect. With an aspect of 6:9, you could set it as
1600 x 900, or 800 x 450, or 1200 x 675.
On the camera, switch from sky box to solid color and choose a
color for the background that works with the splash image.
Drag the keySplash onto the quad, then resize the quad to
cover the entire viewport (use the Game tab as reference). Then make
the quad a child of the camera so that it scales with it.
Button. Create a new UI object of type Button and
call it
PlayButton. The button will be added under a Canvas
object. If you click on the little arrow next to the name, you should
see a Text object as its child. In this object, set the text
attribute as
Play. Then click on the PlayButton object again and
use the coordinates in the Rect Transformation to position
the button where you want on screen and to set its size the way you
want. Scrolling down in the Inspector, you can also set the color or
the button to your liking (including the highlighted, clicked,
etc. states).
To add functionality to the button, we need an object in the scene
that we can apply the PlayAction script to. Create an empty
object and call it action. Add the script PlayAction
as a component to it. Then select the PlayButton object
again.
At the bottom of the Inspector for the button, you'll see a section
labeled On Click(). Click on the + to add an action
to it. Leave the left-side selection as Runtime Only. Then
below that, click on the little circle next to None and
select the action object from the Scene tab, or drag it from the
Hierarchy onto this field. Finally, from the drop-down menu to the
right of Runtime Only, select PlayAction and
then ClickAction.
Before you can test this, you have to add both scenes to the Build
Settings. Make sure that the name of the scene is spelled correctly in
the script PlayAction. Now when running the app starting from
this scene, clicking on the Play button should load the
scene maze.
This will be continued in the homework.
wbrick.png
door.obj
key.obj
keySplash.png
keyWon.png
CameraControl.cs
GameMaster.cs
PlayAction.cs